|
Easy Icon Maker 5.0 - User Guide and FAQ
Screenshots - More Details
Quick Start of Easy Icon Maker
If you have installed the Easy Icon Maker, then please launch it from your computer's
"Start > Programs > Easy Icon Maker", and you can start your first icon with the following steps,
1, Simply click the menu item "New" under the "File" pull-down menu, or press short key "Ctrl+N" ,
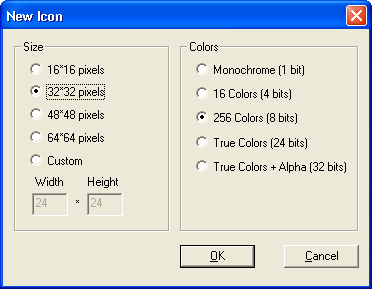
or click the tool button to begin a new icon.The below dialog for new icon settings will be shown.

2, Set the new icon's size and colors and then click the "OK" button.
3, Edit it in the grid editor window with the tools listed in the toolbox and colors listed in the color palette.
4, To add special effects to your icon, select the special effects from the menu "Filters". Or check the
menu item "View > Filters Toolbar" to show the toolbar for filters for easy work.
5, To convert a graphic file into an icon, simply click "File > Import From Graphics..." to import the file into editor for editing.
6. To convert an area on your computer screen into an icon, simply click the menu item "Tools > Capture",
or click tool button to capture the area into editor for editing.
For more details for Easy Icon Maker, please read other topics of this help file carefully.
Hints and Tips
- If you want to convert non-icon format graphic into icon, please use the menu item "File > Import from Graphics ..."
- If you want to convert graphic format that is not BMP, JPG, GIF, ICO into icon, you should convert the format into BMP, JPG or GIF first, then use the menu item "File > Import from Graphics ...".
- Anything shown on your screen may be saved as icon with the "Capture" tool under the "Tools" menu or the "hand" button in the toolbox window.
- Use the menu item "File > Extract From Applications ...", you may extract an icon from other applications like EXE, OCX, DLL, SCR, and so on.
- You may make an icon file with different formats of icons with menu items "Edit > Add Format..." and "Edit > Delete Format", or the two buttons at the right of the drop-down combo box list.
Frequently Asked Questions - Easy Icon Maker
- How to make a point transparent?
To make a point transparent, please follow the following steps:
Step 1. Select the "Erase All" menu item from the pull-down menu "Tools", or
select the "Rubble" button from the toolbox.
Step 2. Select the Rubble's size under the toolbox.
Step 3. Use the Rubble to erase the point to transparent.
- How to make a color to transparent?
To make a color transparent, please do according to the following steps:
Step 1. Select the "Pipe" tool (also called color picker) from the toolbox, or select menu item "Pipe" from the pull-down menu "Tools".
Step 2. Use the color picker to pick a color from the editor window.
Step 3. Click the "Transparent Color ..." menu item from the "Tools" pull-down menu to activate the color palette dialog.
Step 4. The color that picked should have been set to the selected color in the palette, if not please re-select the color that you want it to be set to transparent. Then click the "OK" button.
Step 5. All the points that matches the selected color will be set to transparent.
- How to make *.ico files associated with the Easy Icon Maker?
You may want to make the Easy Icon Maker as your default icon file's editor, in other words, you want to make the Easy Icon Maker associated with *.ico files. It's easy. Click the "Associations Manger ..." from the pull-down menu "Tools". Check the association options and click the "OK" button, the association will be created. That means, when you double click an icon file, it will be opened by the Easy Icon Maker automatically. You may also remove the association with the associations manager, just uncheck the option and click "OK".
Screenshots - More Details
|


 Download Site 1
 Buy Now $29.95