|
ReaWatermark 1.2 - User Guide and FAQ
Screenshots - More Details
How to use ReaWatermark
- Run ReaWatermark by clicking its icons on your desktop or in the program group. Select a folder in the folder tree. Apply a filter as you wish and check Recursive if you want to process files in multiple folders.
- On the main menu, click Edit -> Text to inerset a text box. Change "Enter your text" to "Sample". Change its size to 60. Move it to the center of your image by dragging the center of the text box. If you want to insert a file name for each picture, click "File name" on the floating toolbar. When you apply watermark to your pictures, each picture will contain its file name, which is very good for identification of a picture. However, this file name may not be remembered so you may have to resert the file name next time you watermark your pictures.
- With the text box selected, click angle spin editor to change to 45 degrees. You text box will look oblique.
- On the main menu, click Edit -> Image to insert an image. A open dialog allows you to select an image. You should have a company logo ready. The logo should not be bigger than 1/4 of the picture. Select your logo and click open. Your logo will be in the top left corner. Drag it to the right bottom.
- On the main menu, click View -> Preview. Your watermark is now 50% transparent. Adjust the transparency to your desired level.
- If you want to preview your watermark on another picture, select it from the list in the bottom left window.
- If you have pictures of different sizes and orientation, you can align your watermark to one of the 9 predefined positions on each image. Go to Edit -> Align watermark and click one of the submenus.
- Check your watermarked photos with your image viewer.
- Click Main menu -> File -> Save and exit. Select another folder for your watermarked images.
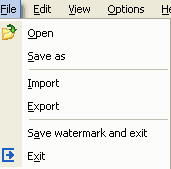
File menu

Open - open files for watermarking. You do not need to do this because ReaWatermark automatically add files to the list when you select a folder. This is only for those who are used to the traditional way of opening files.
Save as -save current image with the watermark as another file.
Import - import watermark from a file.
Export - export watermark to a file.
Save and exit - save your watermark to the images in the list and exit the program.
Exit - exit the program.
Screenshots - More Details
|


