|
BlazePhoto 1.0 - User Guide and FAQ
Screenshots - More Details
Use BlazePhoto to create Slideshow DVD
Make all the image collections in Picture Tray into slideshow DVD, and select to burn it or not, the interface is as below:
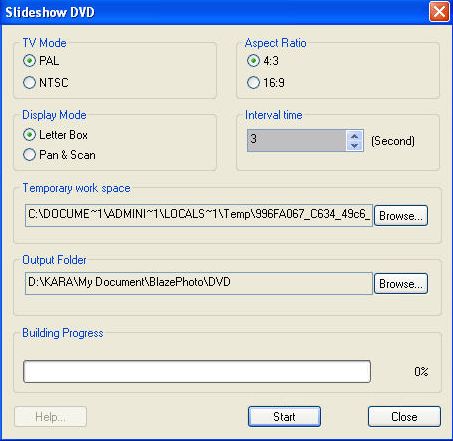
- TV Mode: Set video standard as PAL or NTSC.
NTSC--National Television System Committee, mainly used in Japan, US, Canada, Mexico, etc, with 720*480 resolution;
PAL--Phase Alternating Line, mainly used in China, Hongkong, Middle East and Europe, with 720*576 resolution.
- Display Mode: Set video display mode as LetterBox or Pan & Scan.
- Aspect Ratio: Set aspect ratio as 4:3 or 16:9.
- Interval Time: Set the interval time between two images.
- Temporary Work Space: Specify a directory as the temp folder to create slideshow DVD.
- Output Folder: Specify a directory to save the created slideshow DVD.
Click "Start" button to create slideshow DVD. After creating finished, a dialog box will appear to enquire you whether to burn into disc, if click "Yes", you will burn the DVD into disc just like burn a normal DVD movie.
Frequently Asked Questions - BlazePhoto
- What image format does BlazePhoto support?
BlazePhoto supports BMP, JPG, GIF, PNG, TIF, WMF, EMF image format.
- I add a frame into image for editing, why the image is movable?
After adding frame, the frame may cover some area of the main image, you can move the main image to avoid the area being covered by frame, you can also resize of the frame. If for unmovable main image, please click above "Merge All" to merge the main image, new added frame and other edit results into one image.
- I want to rotate image freely with any degree, how to do?
Currently, BlazePhoto does not support free rotation, it only supports 90, 180, 270, 360 degree rotation.
- I prefer to edit multiple photos at one time, not to switch between Preview and Edit mode, how to do?
First please add the target multiple images into Picture Tray, if want to switch to other mode, please hold the images in Picture Tray. Then enter Edit mode for image editing, after finishing editing one image, double click another image in Picture Tray, you will continue to edit the rest images.
- After finishing editing photos, I prefer to directly print it out, not to save it, how to do?
Right click the edited photo and select "Print", you will print it out directly, not need to save it.
- How to edit the selected area by BlazePhoto?
BlazePhoto does not support area operation, however, you can realize this operation following below steps:
- Open an image, enter Edit page and select Crop tool, crop out the desired area;
- Perform your desired operation on the crop out image;
- Select the whole image, right click to select "Copy" in the pop up box, copy the image onto clipboard.
Don not save image, double click the original image in Picture Tray, paste the cut image into the main image, move it to the right position and save the image.
Screenshots - More Details
|

