|
PhoTags 3.0.55 - User Guide and FAQ
Screenshots - More Details
User Preferences
Set up the default display attributes for new photos.
General Preferences
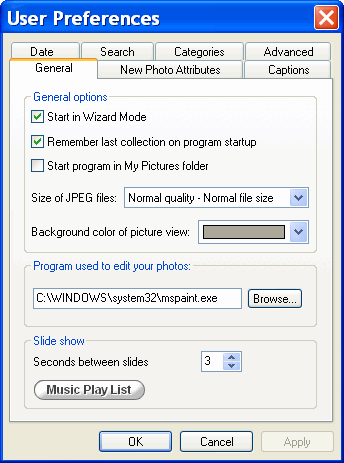
- "Start in Wizard mode" - add a check mark to turn on the option. The Welcome wizard
offers three automatic options for opening your photos when starting to run the program:
open a recent photo, open a new photo and search for a photo.
- "Remember last collection on program startup" - add a check mark to open the software in
the "Manage photos" window with the last collection you worked on.
- "Start program in my pictures folder" - add a check mark to open the software with "My
pictures" folder automatically open.
- Quality versus size of the photograph JPEG file
- Highest quality - select to retain the JPEG photo with minimum compression; as a
result the quality of the photo will be high however the file size will be large.
- Good quality - select to retain the JPEG photo with a higher compression rate then
the Highest quality, as a result the quality of the photo will be better then normal
quality, however the file size will be bigger.
- Normal quality - the recommended selection - select to retain the JPEG photo with a
standard JPEG compression. The quality will be acceptable and the file size will be
the smaller then the other options.
- Background color of picture view - select one of the four background options to change the
color of the view area.
- Program used to edit your photos - the software automatically launches "Paint" as the
default external photo editor. To change to another photo editor click the Browse button
and select the photo editor's EXE file.
- Slide show - Seconds between files - select the delay you want between the slides by
choosing the number of seconds you want.
- Music Play List - select a one or more pieces of music to play with your slide shows using
the "Music Play List".
New Photo Attributes
1. "General"
"Add Photographer name to newly tagged pictures" - add a photographer name for
every new photo opened in software.
"Hide the date for new pictures" - add a check mark so that the date will not display
on the new photos.
"Date display format" - display a date on all new pictures opened in the software.
"Date display format" - set the date display attributes (font name, style, size and
placement) to appear on every new photo.
2. Picture Frame - select a border, size and color or custom frame for all new photo opened in
the software.
3. Caption Position - select to display the caption1 text inside or outside all new photos
opened in the software; if outside the photo select either the top or bottom option.
Captions
"Default display attributes for the text captions":
- Font - select the default font type, style, size and color for all new captions.
- Caption 2 color - select a different default color for Caption 2.
- Text Placement in the Photo -
- "Justification" - select to display the captions on the left, right or center of all new
photos.
- "Position" - select to display the captions text on the top or bottom of all new
photos. The captions will display inside the photo.
"Sample" - to preview the font selections you made.
Date
"Default display attributes for a date":
1. Font - select the default font type, style, size and color for the date displayed on all new
photos.
2. Text Placement in the Photo -
- Justification - select to display the date on the left, right or center of all new
photos.
- Position - select to display the date on the top or bottom of all new photos.
3. Sample - to preview the font selections you made.
Search
Select your default search criteria.
1. "Directory" - select a default directory on your hard drive.
2. Search in - select the Active Captions data you want searched; captions, photographer
and/or keywords. Set one or all as a default when you open the search box.
Categories
Assigning categories helps you organize your photos and also allows you to search your
photos by category.
1. To add a new category to the personal categories list - type your text into the "New" text
box and click the "Insert" button.
2. To remove a category - select one from the "Personal categories" list and click the
"Remove" button.
Photo Selection
Select one of the options for when a photo thumbnail is double clicked from the thumbnails
view in the "Manage photos" window.
- "View the photo full screen" - view the photo in full screen mode
- "Add that photo to the current collection tray" - the photo will be automatically added to the
current open collection.
- "Add to current collection and enhance the photo" - the photo will be automatically added
to the current open collection and will open in the "Enhance photos" window.
- "Add to current collection and add captions to the photo" - the photo will be automatically
added to the current open collection and will open in the "Active Captions" window.
Screenshots - More Details
|

