| bookmark this page - make qweas your homepage | ||
| Help Center - What's New - Newsletter - Press | ||
| Get Buttons - Link to Us - Feedback - Contact Us |
| Home | Download | Store | New Releases | Most Popular | Editor Picks | Special Prices | Rate | News | FAQ |
|
|
Handy Recovery 4.0 - User Guide and FAQScreenshots - More DetailsHow to Recover Files?Step 1: Select Disk and Analyze It In the top left corner of the program window there is a list of all locally drives available on your system. Select the one that contained the lost file or files. Now click the "Analyze" button on the toolbar. Handy Recovery will start analyzing the content of selected disk. This procedure is needed to find links to all deleted files and folders on the disk. Unfortunately it is impossible to go right to your file until the whole content of the disk is analyzed, so the procedure will take some time. When analyzing, the program will display folder tree in the left view of the window. Newly found folders will be added to the tree. You can stop the process by clicking the "Stop analyzing" button on the toolbar, however it is recommended to wait until the process is finished and the full folder tree is displayed. 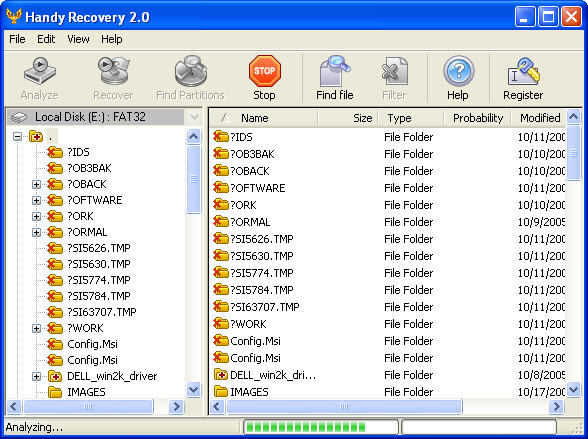
Step 2: Find Lost File on the Disk? If you select a folder in the left view, you will see its content in the right view. Now you can browse the content of your disk right like you do in the Windows Explorer. In addition to existing files and folders you will also see deleted ones. They are marked with a red cross over the icon:  - for deleted files, - for deleted files, - for deleted folders. A small red cross at the bottom right corner of the folder icon - for deleted folders. A small red cross at the bottom right corner of the folder icon  means that the folder exists, but it contains deleted files or folders. means that the folder exists, but it contains deleted files or folders. You can click the "Filter" button on the toolbar to make the program show only deleted files and folders. Use the right view to select files and folders that you want to recover. You can also click the "Find file" button on the toolbar to search for a file by a part of its name or by a mask. Step 3: Recover the File After selecting files and folders that you want to recover, click the "Recover" button on the toolbar. The "Recover" dialog box will show up. In this dialog you select a folder where you want to save the recovered data. If you recover several files, it is strongly recommended to select a location on a different disk. This way you will make sure that first recovered file will not be saved over the data required to recover the next file. You can also select the following options: Restore folder structure. If this option is selected, the full branch of the folders tree containing the selected files and folders will be recovered to the selected folder. Recover alternative data streams. Recover alternative data streams along with the main file data. Alternative data streams are used on NTFS file system to store additional information about files, such as user comments. Screenshots - More Details |


|
Search -
Download -
Store -
Directory -
Service -
Developer Center
© 2006 Qweas Home - Privacy Policy - Terms of Use - Site Map - About Qweas |