How to fix the blurred video with EnhanceMovie? How to fix the blurred video with EnhanceMovie?
When you shoot fast moving objects such as birds, animals, cars, athletes etc., the details in your video get a bit smudged and blurry. Although our eye can't see all details of moving objects either, we definitely want to have everything in our videos as sharp as possible.
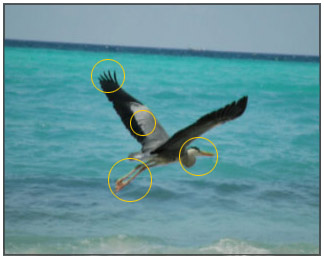
In the image below we see a heron flying away. At the first sight, this video doesn't need fixing. However, we'll try applying the  Sharpening filter and look what'll happen - especially to the areas marked with yellow circles. Sharpening filter and look what'll happen - especially to the areas marked with yellow circles.
Step1. Please download EnhanceMovie and install it; you can know more about it by visiting here: http://www.qweas.com/download/video_dvd/video_editors/enhancemovie.htm
Step2. Open your file with EnhanceMovie by clicking
Step3. Right-click the Sharpening filter's icon and select Add and Customize from the drop-down menu:

Step4. This will add the filter to the list of applied filers and open the filter's settings dialog. Move the slider to the maximum (100) and click OK.
Hint:You can also type in the values using your keyboard.
To better see the changes, we'll zoom the original and fixed videos 300%. Let's look closer at the problem areas that were marked with the circles.
| a. | Before | | After | | 
|  |  | The wing became a bit darker, that renders the real color better. The shapes of the long feathers at the end of the wing are more distinct, we can clearly see the border between each feather and between the wing and the water. |
| b. | Before | | After | | 
| |  | The details of the wing became more sharp and clear. |
| c. | Before | | After | | 
| |  | The thin legs had almost no details. After restoring, we're able to see the clutches; shadows became more sharp as well. |
| d. | Before | | After | | 
| |  | The head became sharper. As we can see on the fixed video, the black spot at the top of the head and the beak became darker. |
Compare the original and the enhanced videos at the animated image below. Remember, we thought this video was perfect, but look: even the waves became sharper!
Related Step by Step Guides and Tutorials:
How to repair the purple video with EnhanceMovie?
How to restore too dark video with EnhanceMovie?
How to filter the interlaced video with EnhanceMovie?
How to recover files from formatted hard drives?
How to recover lost files from re-partitioned hard drives?
How to recover fdisked drives?
How to copy AVI RM Video Movie to Palm Pocket PC(PPC).
How to convert AVI(DivX, XviD), VOB to SWF, FLV?
How to convert 3GP Video to SWF, FLV flash Video formats.
|
 RSS Feeds
BBS Forum
RSS Feeds
BBS Forum